

The best part about owning a mini bike is riding it, but nothing is more frustrating than taking it out for a ride and discovering something wrong. Your day of riding can quickly turn into a day of wrenching. Often this happens because the bike hasn’t received the proper maintenance. Follow the guidance below to make sure this doesn’t happen to you.
If you want to keep your mini bike in tip top shape, you not only need to perform the proper maintenance, you also need to do it on a regular basis. Having a maintenance routine can identify potential problems early, saving you valuable time, money and frustration. This post will show you how to make sure your mini bike is always ready to ride when you are.
Read the owner’s manual
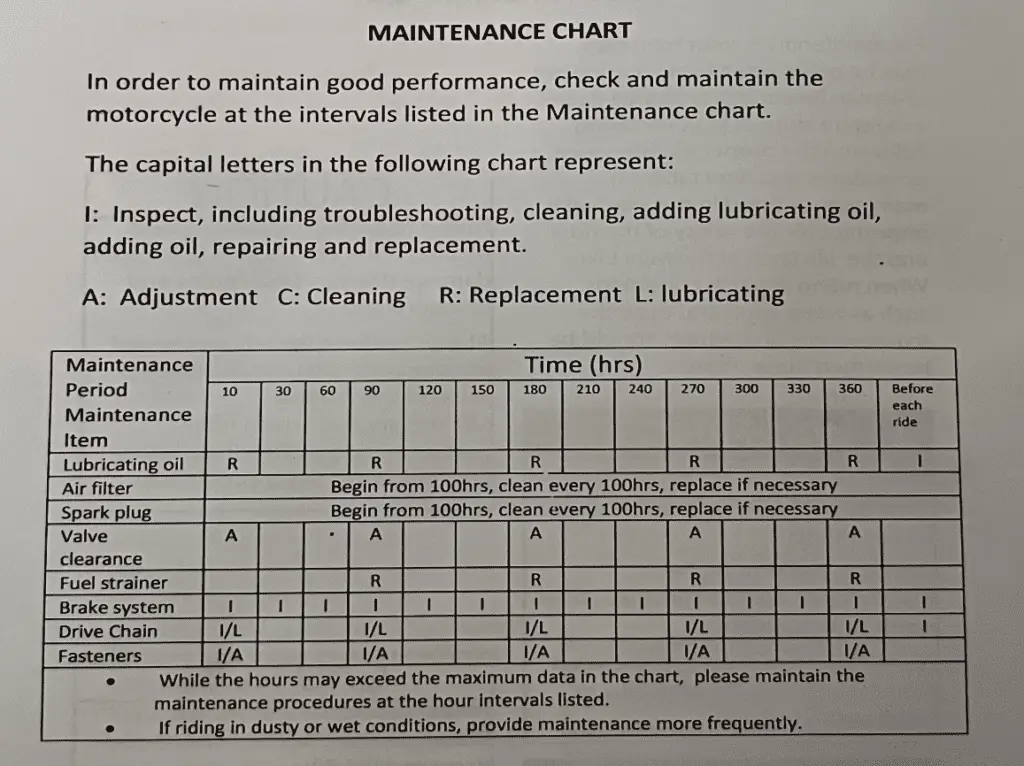
The best place to start when it comes to mini bike maintenance is the manual. Every manufacturer provides an owner’s manual that includes the recommended maintenance for that make and model. It usually includes timeframes as well. For example, below is a picture of the maintenance chart provided in the Coleman Owner’s Manual.
Engine Oil
We are going to talk about engine oil first because it is so crucial. In the chart above the engine oil is referred to as lubricating oil because that is exactly what it does, it lubricates the engine. This is extremely important. An engine is filled with metal parts meshing and spinning at rates of 3,000+ rotations per minute (rpms). The in sync spinning and meshing quickly turns to unwanted grinding without proper lubrication. And this grinding quickly leads to damage.
To keep this from happening, change your oil according to the manufacturer’s recommendation. One thing you might notice on this chart is that the first oil change is at only 10 hours. When these engines are newly assembled, there are often metal shavings and dust from manufacturing that gets trapped inside the crankcase. Changing the oil after only 10 hours flushes out this unwanted debris.
Not only do you need to change your oil, but you also need to check it on a regular basis. If your oil level is low, you need to add more. The engine won’t be properly lubricated without the right amount of oil.
Air filter
The air filter is also very important to the mini bike engine. It allows the engine to breathe while keeping it from sucking harmful dirt and debris into the engine. When an air filter is dirty, the engine does not receive enough air. At a minimum this can make the engine run rough, but it can also cause the spark plug to foul, rob the mini bike of power and negatively affect the fuel mileage.
The good news is cleaning an air filter is really easy. All you have to do is take the air filter cover off, pull the air filer out and blow it out with an air compressor from the inside out. Also, you can remove the outer foam portion and gently wash it with mild soap and water. Don’t get too carried away and make sure you let it dry before starting your engine.
Eventually you won’t be able to just clean the air filter and you will have to replace it. If you are riding in dusty, muddy or wet areas, you will have to clean and replace your air filter more often.
If you have an aftermarket air filter, like the ones sold in performance kits, the cleaning process is going to be a little different. First, you will need to remove your air filter and then spray the inside and outside with a degreaser like the one provided by K&N. Then give it a low pressure rinse from the inside out. You may have to repeat these steps a couple of times depending on how dirty your air filter is. Once the air filter looks clean, make sure you let it dry completely. The last step is to re-oil the filter using K&N’s air filter oil and re-attach the air filter. Check out the video below that walks you through this process.
Spark plug
Spark plugs rarely have issues, but it is still a good idea to check them. All you need to do is remove the spark plug and take a good look at it. Look for carbon deposits and clean if necessary.
You can also double check to make sure your spark plug is sparking correctly by removing it from the engine, but leaving it attached to the plug wire. Make sure the plug is touching or “grounded” to the engine block and then pull the pull start. If you see sparks between the spark plug gap, you are good to go. Don’t hold the spark plug during this process or you will get a shock to wake you up.
If you don’t get a spark, then you may need to clean your spark plug again. To do this, run a paper towel or a non-fuzzy shop towel through the spark plug gap. If this doesn’t solve your problem, try inspecting the gap of the spark plug and adjusting it. A lot of small engine spark plug gaps should be between 0.6-0.8mm.
Fuel filter
Fuel filters are easy. There is nothing in the way when in comes to accessing them and it is hard for them to hide anything because they are see through. A fuel filter is a filter in the fuel line between the gas can and carburetor that filters out any debris. They can become clogged, but because they are clear often you can see the gasoline is not passing though it at the rate it should.
If you realize this is what is happening, replace your fuel filter. They only cost a few bucks and are easy to find. Honestly, you can run your mini bike, go kart, lawn mower or whatever else you have without a fuel filter. In fact, not all small engines have an inline fuel filter, but that increases the chances that eventually something will get sucked into the engine that shouldn’t. This is bad and adding a simple in-line fuel filter can save you a lot of trouble down the road.
Brakes
Brakes are important. Riding a mini bike is fun, but if you can’t stop that fun becomes frightening. One thing about brakes is that it is obvious when they are not working properly, but you don’t want to let it get to that point. There are two common types of brakes, hub brakes and disc brakes. Both types need to be regularly inspected and adjusted as needed.
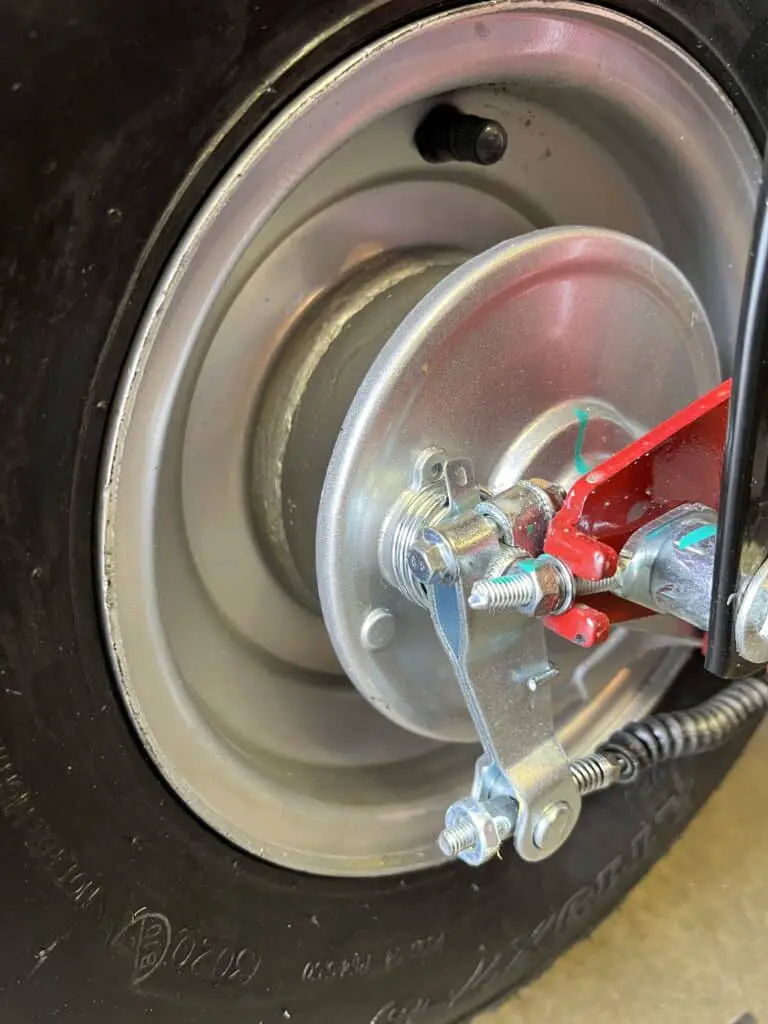
Drum brakes are sealed which keeps dirt, mud and other debris out of the brake assembly. There is an adjustment nut at the drum that attaches to the end of the brake cable. To adjust your drum brakes, turn the adjustment nut clockwise to increase braking and counter clockwise to decrease braking.
Unlike drum brakes, disc brakes are not sealed. This means there is potential for dirt, rocks or other debris to interfere with the brakes doing their job. It is important to inspect your disc brakes before each ride, especially if you have been riding in muddy or dusty areas. You want to make sure nothing is stuck between the brake pads and the rotor (disc). Look to make sure that the rotor is centered between the two brake pads and that there is a sliver of a gap between the two pads and the rotor. When you pull on the brake lever, both pads should fully contact the rotor at the same time.
If you discover dirt or something else stuck in your brakes, just clean it out. Do not use any sort of oil and be careful using soap. Oil, soap and anything else that can act as a lubricant on your brake pads or rotor can significantly reduce your stopping ability.
Over time your brake pads will wear out. If you notice you don’t have very much material left on your brake pads, it is probably time to replace them. Also, if you notice one brake pad is wearing down faster than the other, you may need to adjust your brake caliper alignment. In this situation you also want to inspect the rotor and make sure it is straight. Braking causes a lot of friction that heats up the rotor and in some extreme cases this can warp the rotor. Also, if you are riding on rough trails and hit the rotor against an object, you could bend it. If this happens, replace your rotor.
Finally, you want to check and adjust your brake lever when necessary. The brake lever should have a little bit of free play in it, about 2-4 mm. The free play in the brake lever is important because it keeps the brakes from engaging too quickly and taking the rider by surprise. To adjust the brake lever, loosen the jam nut on the brake cable and then turn the adjuster nut until you reach the correct amount of free play. Once it is set, tighten up the jam nut.
Centrifugal Clutch
If you have a centrifugal clutch, you need to clean and lubricate it on a regular basis, Coleman suggests after every 5 hours of riding. First, you will need to remove the clutch cover. To clean the clutch, wipe it off with a clean rag.
To lubricate the clutch, place a few drops of motor oil (same as used for the engine) on the drive shaft where the clutch attaches. Do not put oil on any other parts of the centrifugal clutch. This could cause the clutch to malfunction. Once you have cleaned and lubricated the clutch, put the clutch cover back on and you are ready for your next ride.
Torque converter
Torque converters do not require very much maintenance. The most important thing is that you regularly inspect the torque converter and it’s belt. All you need to do is remove the torque converter cover and take a good look. Ensure that everything is lined up correctly and there isn’t dirt, mud or other debris on the belt. If there is, simply wipe it down with a rag. If the belt is cracked or worn, it is probably time to replace it. Replacing the belt is the most common maintenance performed on a torque converter.
Chain and sprocket
Inspecting the chain and sprocket is a critical part of maintaining your mini bike. You want to check the chain for wear, rust, bent links, proper tension and proper lubrication. If the chain is bent or rusty you should probably replace it.
As you use your mini bike, the chain will stretch. This happens to all chains and is why checking the chain tension is a necessity. Some mini bikes have a built in chain tensioner that is adjustable and others include an adjustment for sliding the rear wheel forward or back as needed. Check your manual for the proper tension. As a general rule of thumb, at the center point between the wheel and jackshaft/clutch/torque converter the chain should move up or down between 1/2-3/4 inches.
Lubricating your chain will extend the life of your chain and sprocket. Many manufacturers recommend lubricating the chain before each ride. To lubricate your chain, first clean it with chain cleaner and then use chain lubricant designed for motorcycle chains. Do not use WD-40 or other generic lubricants to lubricate your chain.
Most lubricants designed for chains are available in spray cans. To apply the lubricant, secure the mini bike with the rear wheel lifted off the ground. Then spray the top of the chain while you spin the back tire. This will allow you to apply the lubricant evenly. Once the lubricant has been applied, give it some time to soak in before taking a ride. If you immediately take a ride after lubricating the chain, the centrifugal force will send the lubricant flying off the chain before it has a chance to soak in.
When inspecting the sprockets you want to look for worn down or broken teeth. If any teeth are missing, broken or worn down, it’s time to replace the sprocket. You want to make sure your sprocket isn’t bent and is in proper alignment. Also, double check the bolts holding the sprocket in place to make sure they have not rattled loose.
Throttle cable
It is important that the throttle cable is adjusted correctly so the mini bike functions as it is supposed to. No throttle means no acceleration. Just like the brake lever, the throttle should have a little bit of free play. This is to ensure that the throttle doesn’t rise every time the handle bars are turned. As a general guideline, the throttle should have 2-6 mm of free play.
Adjusting the throttle is very similar to adjusting the brakes. You need to loosen the jam nut first and then turn the adjustment nut to the proper setting. Once the throttle is adjusted, re-tighten the jam nut to hold it in place.
Tires
As with everything else we have talked about in this post, tires need to be inspected on a regular basis. Things to look for include cracks, holes, worn down tread, and proper tire pressure. Most mini bike tires require a low tire pressure around 10 psi, but always check the side of tire to be sure. If the tire has cracks, cuts or the thread is bare, you will want to replace it. If the tire has a slow leak or a hole you may be able to repair it with a tire plug or patch kit.
Washing and inspecting
People often don’t think of washing their mini bike as part of their maintenance. However, dirt and grime are often the culprit that leads to problems. Washing your mini bike is important, but you want to make sure you are doing more good than harm.
When you wash your mini bike use low water pressure, not a high pressure nozzle that can force rocks and debris into tight places where you don’t want it. Also, you want to stick with car soap or mild detergents and soft bristled brushes. Degreasers and stiff bristled brushes can scratch and damage the bike. Finally, be very careful not to spray water directly into the air filter intake, muffler, brake cable, throttle cable, or electrical switches.
Every time you ride a mini bike it gets rattled and bounced around. Taking through rough terrain is part of the fun. However, this greatly increases the chances of something coming loose. Keep an eye out for loose or missing nuts and bolts. Every so often, it’s a good idea to take a wrench and check all the nuts and bolts on your mini bikes. A couple of critical ones include the drive shaft nut that holds on the centrifugal clutch/torque converter and the axel nuts.
Final Thoughts
Properly maintaining your mini bike is important, but it doesn’t have to be difficult. Looking at this long list can be overwhelming, but you don’t need to do everything every ride. If you make a schedule and just keep an eye out for developing issues you will have hours of stress free riding. On the other hand, if you ignore clear signs of needed maintenance, it is only a matter of time before that small issue becomes a big one. Happy riding.