
Throughout my life I have fished out of a lot of aluminum boats. There is something about them that just makes sense. They are small, light weight, and durable at the same time. They can get you out on the water without breaking the bank and they take almost no maintenance. So I decided it was time to get another one.
Not only did I decide to buy one, but I decided I needed to build my own custom fishing machine. My goals with this build are to make it low maintenance, budget friendly as possible, and so three people can fish in it comfortably. I also wanted to add some built in storage. Organization is key in small boats. With a rough idea in mind I started the hunt.
The Boat
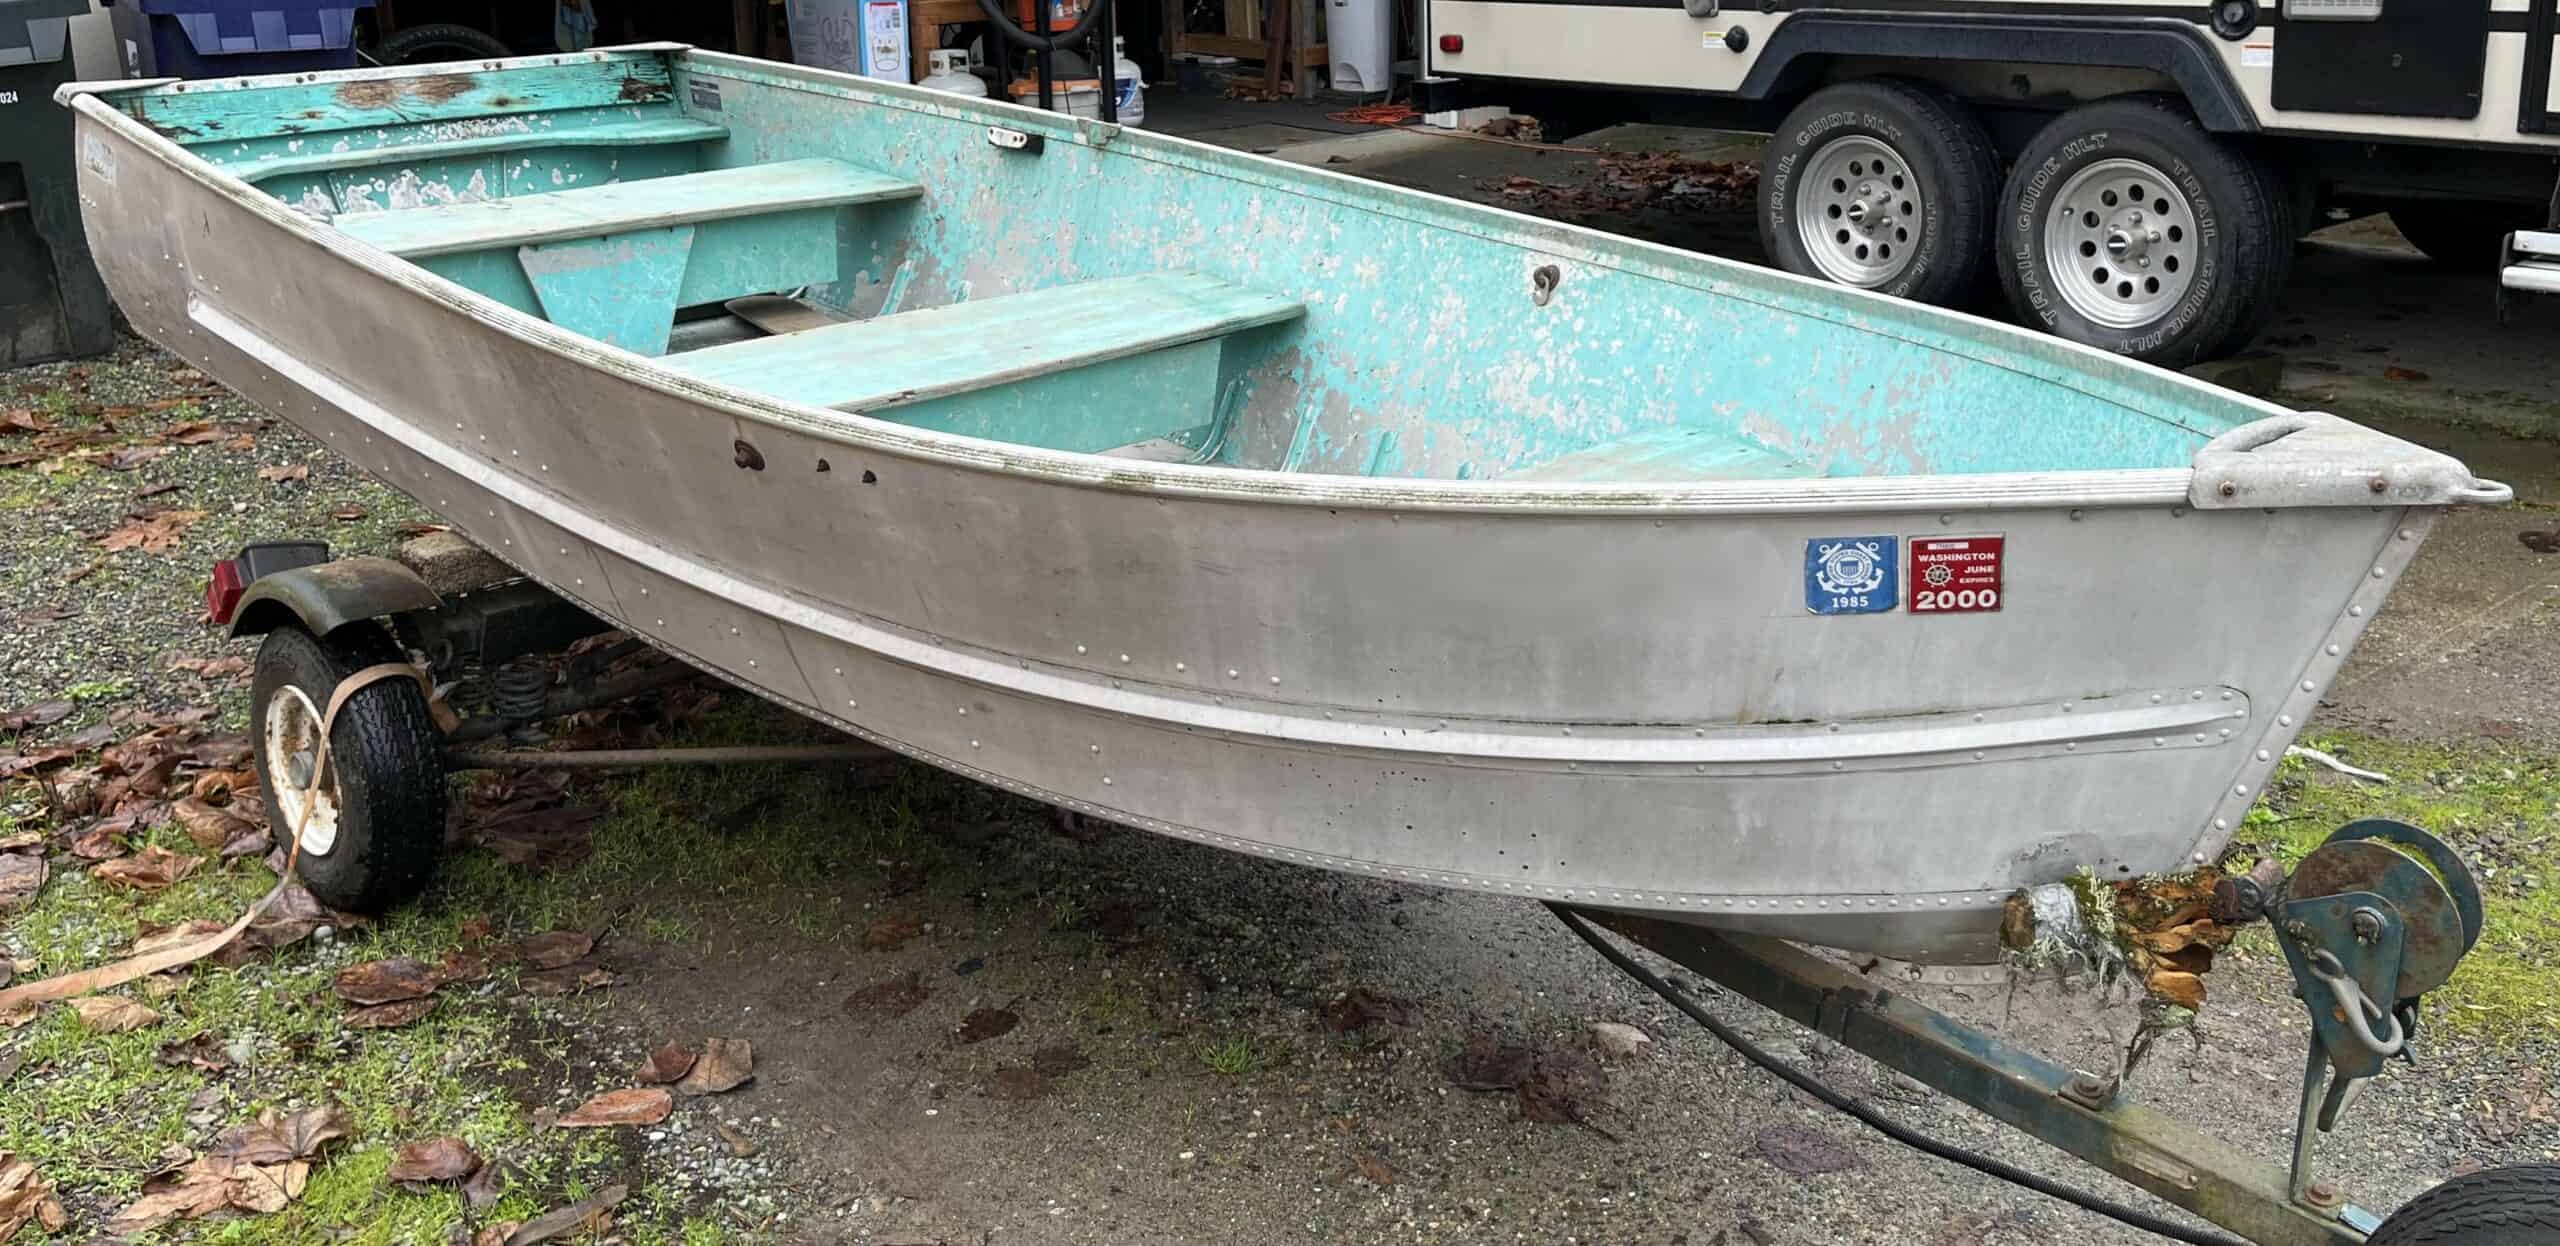
After a few weeks of searching the internet, I found a 12 foot Fishmaster manufactured in 1968. I had never heard of this model of boat, but the price was right, it came with a trailer and it had a mostly flat bottom to lend to it’s stability. So, I bought it.
The boat was in pretty decent shape considering it’s age, but it was clear this was not going to be any small project. The transom was rotten, there was a piece missing from keel, one oar was broken and about three quarters of the paint had worn off.
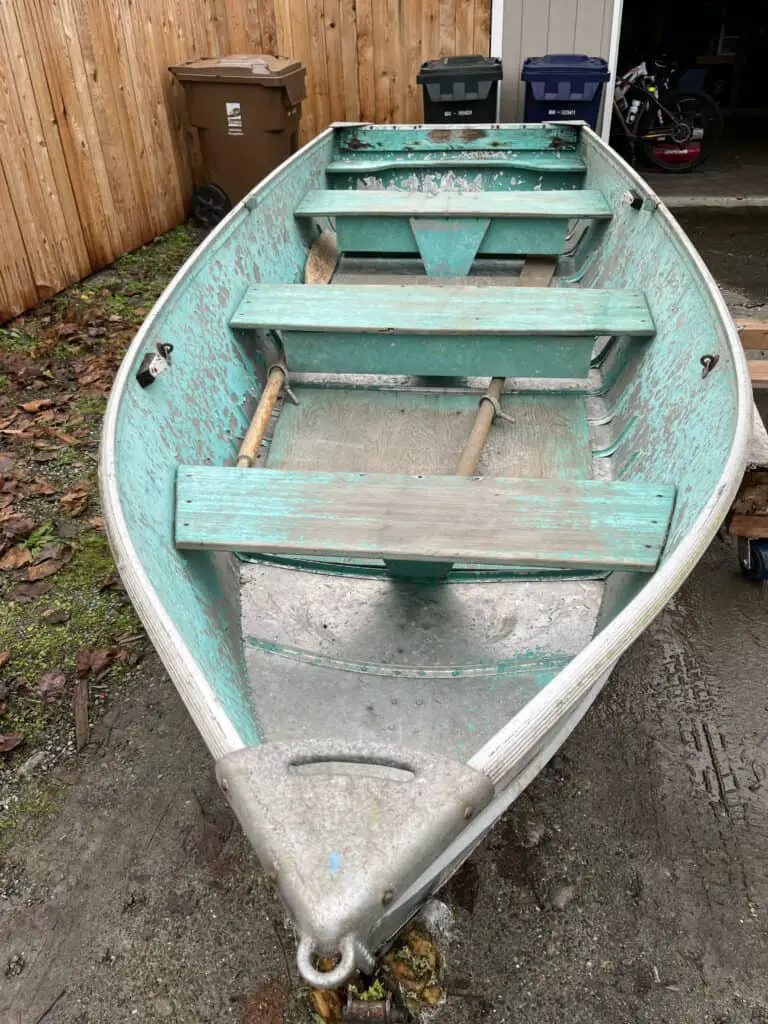
The previous owner left the boat sitting for over 20 years, but had stored it upside down so it didn’t fill with water. So surprisingly enough, the original wooden floors and seats from 1968 were in great shape and had no rot at all.
However, the bottom didn’t have a bunch of dents and scratches. With the shell of the boat in pretty good condition, it made for a good foundation for my project.
The Trailer
The trailer was in a little bit rougher shape than the boat. Ok, I will be honest, it was in a lot rougher shape. The entire thing was covered in surface rust, the winch cable was rotten, and one of the tires was flat.
To my surprise, the tire still held air, I used ratchet straps to secure the boat and after a generous about of force and WD40 I was able to free up the hitch coupler. With the trailer behind my truck and the boat creatively strapped to the trailer, I was able to make the 25 minute drive home.
One issue I noticed right away was that the boat and trailer are so small that I can’t see them behind my truck while driving. This isn’t that big of an issue driving forward, but it did make backing the boat into my driveway much more difficult. This is definitely something I will need to address before I try launching the boat.
The trailer desperately needs a complete overhaul. The lights, wiring, winch, tires, rubber roller and ball coupler all need to be replaced. The trailer frame needs to be sanded down and repainted and I am sure the axel bearings should probably be replaced too.
The plan for the trailer is to add padding where the boat rests on the keel, a ramp that allows me to walk down the trailer when loading and unloading the boat and guide poles tall enough that I can see them while backing the trailer up. There will be more to come on the trailer rebuild later.
The Layout
My goal with the layout was to have a casting deck in the front, a casting deck in the rear, and a good amount of floor space in the middle. This will provide space for 3 people to fish comfortably, one person on each casting deck and one person on the floor in the middle.
The layout picture below makes the front deck look smaller than the rear deck, but this is an optical illusion because of the perspective. The front deck will be a about 10 inches larger than the rear deck.
I also want a hatch to house the battery and electronics, a hatch for wet gear, a hatch for dry gear, and perhaps a smaller hatch that could double as a small cooler. The boat also needs a place for the gas tank, a way to store fishing poles and somewhere to mount a trolling motor.
Let’s start with the front and move our way back. In order to mount a trolling motor, the boat will need a bow cap large enough to fit a bow mount trolling motor bracket. For now, I am going to only discuss the structural layout and leave the electronics for another post.
The Bow Cap
This bow cap will need to be large enough and strong enough to support the trolling motor. The plan is to make it out of aluminum with cross supports and it needs to come back about 24 inches from the bow of the boat.
This should allow enough room to add additional items as necessary. A few additions I am considering for the front bow cap are a small light bar, a tie-down cleat, a cup holder or an anchor line quick release. I want to make sure that there is enough space that I have options.
This will also create a covered cubby hole at the front of the casting deck for additional gear. One item in particular that would be nice to stow under the bow cap would be the foot pedal for the trolling motor when it is not in use. This would just tuck it away nicely and free up space on the casting deck.
The Front Casting Deck
Next, lets talk about the front casting layout. It needs to be large enough to stand and fish from, for three hatches and for a mounted seat. To fit this all in, I calculate the casting deck needs to be about 40 inches deep from where the bow cap ends.

There will be one hatch in front center. This hatch will be the wet hatch to stow the anchor, bow line, life jackets, paddles, and any other boating necessities that can or will get wet. proper drainage will be important for this hatch.
The plan is to have two hatches just further back from the center front hatch. The one on the left will house the battery, fuse panel, battery charger, switches and any other electronics that get added over time. It will also be a good place to store some basic tools. Always better to be safe than sorry.
The right hatch will be the dry storage hatch. This will be an easily accessible hatch for jackets, towels, phones, or anything else that needs to stay dry on a boat. Having these storage hatches will free up precious deck and floor space.
The Floor
The floor space between the two decks will be about 48 inches. One thing that has always bothered me about aluminum boats is that the back seat and middle seat are so close together that if you have someone else in the boat, you are stepping all over each other.
This will also allow more space to put things like coolers and tackle boxes. However, more floor space requires removing the center bench in the boat. One consideration is that this could affect the structural integrity of the side walls when the middle seat isn’t there to support them.
The larger floor space is also important to the goal of having three people fish comfortably from the boat. The person standing on the floor in the middle has to be very aware of the other two around them. More floor space means more room for that person cast without snagging their fishing buddy.
The Rear Casting Deck
The rear deck layout is pretty simple. It will be the smallest fishing area at about 30 inches, but that should still be enough space especially with room to swing the pole to cast over the back of the boat.
It will have one large hatch in the back that will house the gas tank and a bilge pump. This hatch will also be large enough for additional wet storage opposite of the gas tank for things like a bait bucket. I may also add a smaller hatch next to the mounted driver seat that could be used as a cooler or just dry storage.
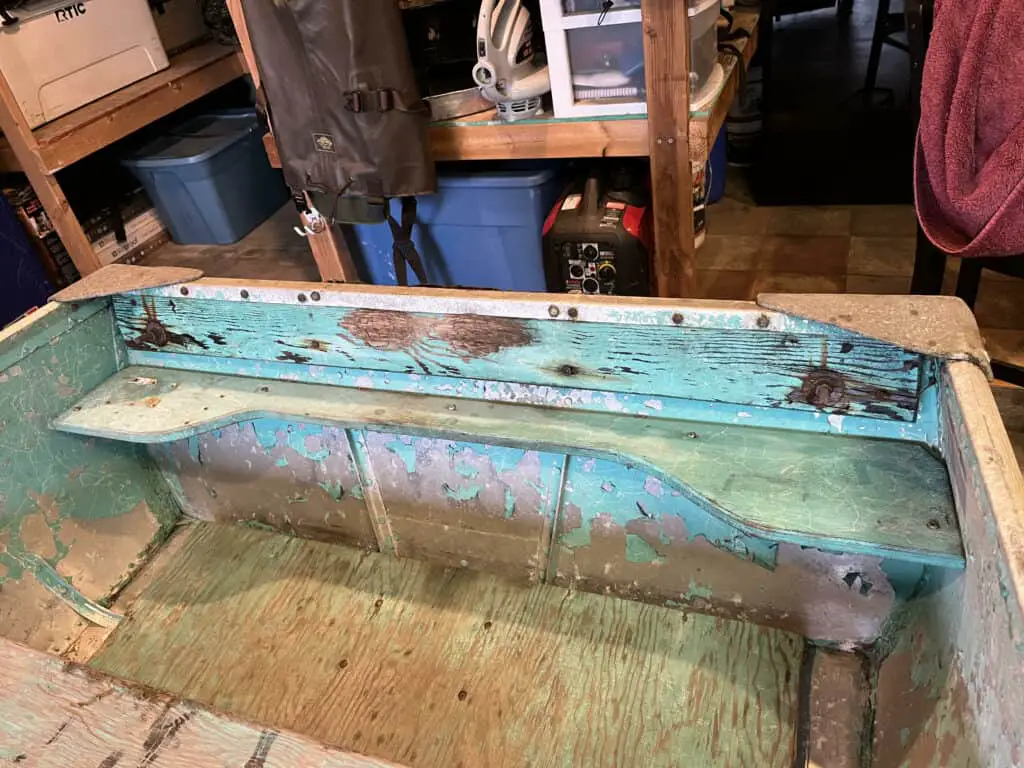
The nice thing about the way this boat was manufactured is that there was a ledge along the back of the boat that was the same height as the rear seat (see picture below). So, I can use those original ledge and seat mounts to support the back deck.
The Materials
I have put a lot of research into what materials I would like to use for this boat. My goal is to make this boat as durable, light weight and maintenance free without breaking the bank. After all, I don’t want to end up spending more than I would just going out and buying a brand new boat.
Originally, I wanted to build everything out of aluminum from framing to diamond plated floors and decks. It’s sturdy, light weight, pretty easy to use, will never rot or rust. Plus, then I could just pressure wash it to clean the boat. And, I wouldn’t have to hassle with the extra step of applying marine carpet or something else similar.
However, going all aluminum has two downsides. First, aluminum is expensive and the cost just doesn’t make sense for this little row boat. Second, aluminum gets hot in the summer sun and I don’t want to have to wear shoes all the time on the boat.
So I decided on a mixed bag of materials, specifically aluminum, wood, pour foam, foam board, and EVA foam floor decking.
Aluminum
I will use an assortment of angle aluminum, aluminum square tubing, and aluminum Z channel to frame the boat. This will give me a strong base that should last the test of time.
I would also like to do the bow cap and hatch lids in aluminum if I can find the material at the right price. The hatches have to withstand the movement of opening and closing. I think aluminum will be better for this because over time wood might warp or the hinge screws might start to pull out from so much use.
Plywood
The floor, decks and vertical walls will be made out of plywood. Right now I am leaning towards 1/2 inch exterior grade plywood that is resin coated for the floor and decks and 1/4 inch resin coated plywood for the walls.
I am going to do some experimenting, but I link 1/2 plywood will be strong enough if I frame out the boat correctly. This will also be much lighter and a little less expensive than using 3/4 inch plywood. The jury is still out on this, so we will have to see.
1/4 inch plywood for the walls shouldn’t be a problem because the aluminum framing is going to be providing all the structural support. The plywood for the walls is mostly just cosmetic so the hatches are completely enclosed.
Foam Board
Foam board will be used under the floor between the ribs of the boat. This will serve three purposes. First, it will add buoyancy to the boat in the event it ever gets flooded. Second, it will provide support to stiffen up the floor. Third, it will provide a little sound dampening so that the waves hitting the aluminum bottom while driving are not quite so loud.
The foam board will also be used in the walls between the aluminum framing. This will probably provide a little bit of additional support to the framing, but that is just a bonus. The real reason for doing this is again to provide the boat a little more buoyancy in a worst case scenario.
Pour Foam
I plan on trying out closed cell pour foam in strategic locations. This again is to provide the boat with more buoyancy. There will only be a few places this will be used. The largest area will be under the rear deck where the original back bench was.
Then I also plan on pouring it around the rear two hatches of the front deck. This means I have to pre-plan the placement of electronics to make sure that I run some sort of conduit for the wires before I pour the foam.
EVA Foam Sheets
As for the deck and floor surface, for a while I will probably just leave it as resin coated plywood so I can get the boat out on the water. Eventually I plan on covering the deck and floor in EVA foam sheets. This is a material that is comfortable to walk on, easy to clean, comfortable and doesn’t mold or mildew.
I plan on tackling this project in stages and providing an in-depth post on each stage of the build. Hopefully this project will help others tackling a boat build of their own.
